Example Webhook
You can use this example webhook to test your application. However, you should use your own webhook in production. The example simply authenticates all requests for 7 days of offline usage.Building your Authentication Webhook
Incoming POST body
When your client device wants to authenticate using your webhook, your webhook will receive an HTTP post with a JSON payload that looks like:v1
JS
Deploy your webhook
Now, deploy your webhook. The portal will attempt to reach this webhook. That means you must deploy it somewhere that this HTTP request is accessible.Please be sure that this endpoint is not behind a firewall or VPN. If you cannot get around this requirement contact us.
Declare your Webhook as Ditto Authentication Provider
To enable Authentication, you need to declare your deployed webhook as a Ditto Authentication Provider through the Ditto Portal. Open your database in the portal and find the Authentication Mode & Webhook Settings section. Ensure that “Authentication” is turned on: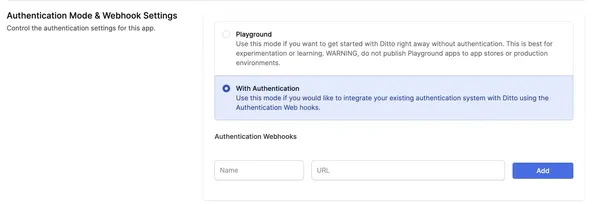
- Name: Provide a unique name for your webhook provider. This name will be used by the Ditto SDK to authenticate clients.
- URL: The URL is the fully qualified URL of the webhook that you deploy yourself starting with
https://.

SDK Authentication
Once you have deployed your webhook and registered it as an authentication provider in the portal, you can use the Ditto SDK to authenticate your clients. In v5, authentication is configured usingDittoConfig to connect to your server, and you set up an expirationHandler that is called when authentication credentials are about to expire. Within this handler, you call ditto.auth.login(token, provider) to refresh authentication.
Use the provider name you set in the portal and the token that your
authentication webhook expects. The token is typically a JWT or some other
authentication token that your webhook can validate.